Share
Pin
Tweet
Send
Share
Send
Now it’s very fashionable to emphasize the waist. Is it a bit short for you? Just make small changes to the pattern - and the proportions are obtained
perfect!
For example, you have a short or, conversely, a long waist. To determine how many centimeters you need to change the pattern, measure the length of your back and compare with the data shown in the burda size chart. The resulting difference will be the desired number.
How to move the waistline up
1.5 cm or more
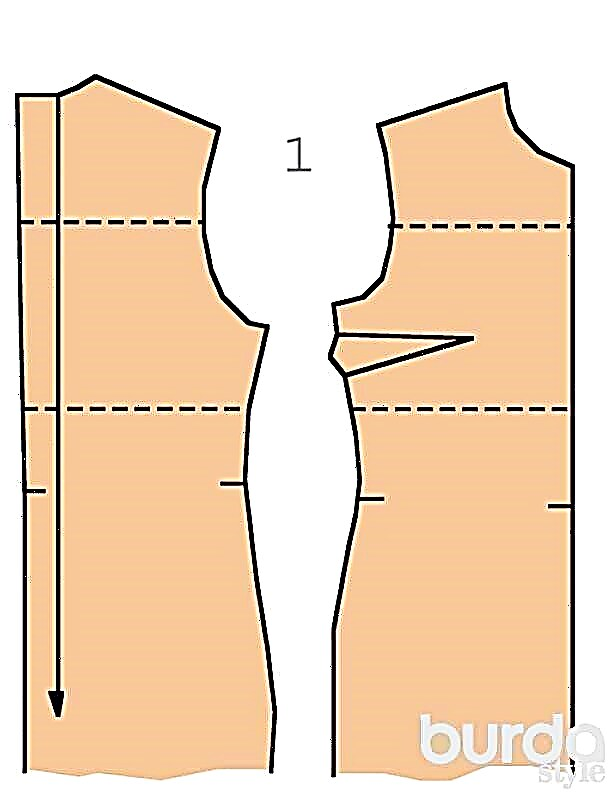
Draw on the paper patterns of the front and back the horizontal support line through the center point of the armhole (½ height) and the horizontal support line in the middle between the lower end of the armhole and the waist line (Figure 1).
Shorten the pattern on the upper auxiliary line by 1/3 of the desired number (see above). Remove the remaining centimeters along the lower auxiliary line. The easiest way is to draw a parallel line at an appropriate distance from the auxiliary line and combine both of these lines (Figure 2).

In order for the sleeve to enter the armhole, shorten the pattern of the sleeve in the upper third of the okat by the same number of centimeters by which the armholes of the front and back along the upper auxiliary line were shortened (Figure 3).
Narrow the pattern of the sleeve with a sloping okon along the lateral edges, nullifying the lines to the lower edge of the pattern (Figure 4).

For a model with one-piece sleeves, shorten the patterns of the shelves, backs and halves of the sleeve by drawing auxiliary lines through the center point of the armhole (½ height) and in the middle between the lower end of the armhole and the waist line (Figure 5).

For a model with embossed seams on the back, starting in the upper third of the armhole (Figure 6), glue the details of the pattern along the line of the embossed seam, and then draw a horizontal auxiliary line through the center point of the armhole (½ height). Having shortened the pattern, draw the line of the relief seam again and cut the pattern along this line.
For a model with raglan sleeves, first attach the patterns of the halves of the sleeves to the patterns of the shelf and the back along the lines of the stitching seams, and then draw the horizontal auxiliary lines through the center point of the armhole (½ height). Shorten the patterns. Then cut off the halves of the sleeve and shorten the patterns of the shelf and back for the remaining number of centimeters.
Less than 1.5 cm
In this case, it is enough to draw only the lower horizontal auxiliary line and shorten the pattern details along it by the desired number of millimeters. Armholes and sleeves remain unchanged.
Share
Pin
Tweet
Send
Share
Send